The IBM OS/2 Warp IAK
The Dial Other Internet Provider (DOIP) - The dialer used for connecting to your local ISP.
The Advantis dialer - used for connecting to the IBM Global Network (Now AT&T Global Network since AT&T bought it from IBM)
IBM's Web Explorer
Netscape Communicator for OS/2
Netscape Navigator for OS/2
FTP-PM
FTP Host
NewsReader/2
Telnet / TelnetPM
PC3270 Telnet (a lite version of IBM's Personal Communications 3270 for OS/2, first available with Warp 4.0)
http://www.hethmon.com/tcpip.html
and for more on updates to MPTS and TCP/IP checkout Duane
Chamblee's page - http://duanec.indelible-blue.com/fixes/LatestWarp4.html
IBM has a document explaining how to configure DOIP as well as how to trouble
shoot common problems - http://service5.boulder.ibm.com/pspsdocs.nsf/c7a34b35e55986f9862563cc00604815/4ea74fe1fc7d7c9206256363006a7d38?OpenDocument.
A source for updates to the Warp 3.0 IAK is located at http://www.os2ss.com/MasterUpdate/masterupdate_i.html
For a listing of all fixes for OS/2, TCP/IP for OS/2 (versions 2.0, 3.10, 4.0 and
4.1) as well as all IBM TCP/IP applications go to http://service5.boulder.ibm.com/pspfixpk.nsf
and select All Fix Packages - By Product.
To protect your OS/2 TCP/IP 4.0 or 4.1 machine from a synflood (Ping of Death
attack) check out http://service5.boulder.ibm.com/pspsdocs.nsf/c7a34b35e55986f9862563cc00604815/8a384023f92790f18625653e004eab22?OpenDocument
IBM's Dialer is serviceable, but to get a lot of the features IBM left out, you
should check out the shareware dialer InJoy.
InJoy includes a reconnect on disconnect feature, as well as an auto-learning script
function and other features. An FAQ on the IBM DOIP can be found at http://www.gate.net/~lstone/faq_toc.html
and http://www.gate.net/~lstone/slipinfo.html
also another FAQ on the DOIP can be found at http://www.nhn.ou.edu/~boyd/pppfaq.html
TIP: If you put the text from the Name field of DOIP in the the Optional Parameters
field of the Properties notebook, DOIP will automatically dial that entry.
DOIP Settings
These settings are stored in the TCPOS2.INI file in d:\MPTN\ETC directory. You
need an INI editor such as UNIMAINT to view these settings other then in the DOIP
dialer configuration notebook. Don't try to look at them with a regular text editor,
you may screw the file up. Some OS/2 internet apps use the defaults stored here
others store their own defaults, so you may have to type in some of the same fields
in more then one place.
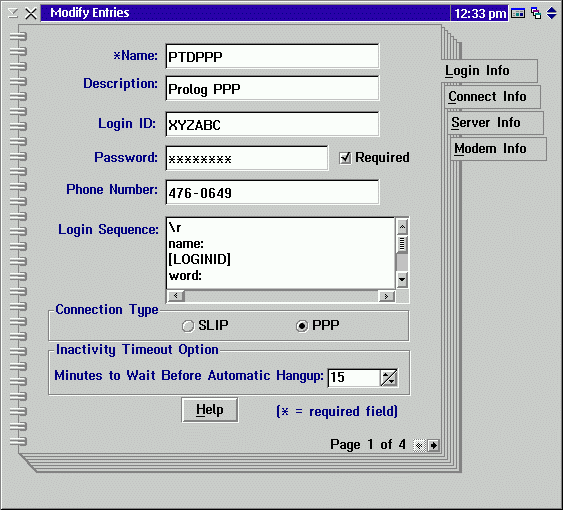
Name: This is any name that makes sense to you as long as it is no more then 8 characters and contains no spaces
Description: This can be any thing you want as long as it makes sense to you and is no more then 11 characters. Spaces are allowed.
To use the IBM DOIP dialer, you need to obtain the following information from
your ISP (Internet Service Provider):
Login ID:This is your personal identifier you were assigned or chose when you signed up with your ISP.
Password:This is the password you chose or were assigned by your ISP.
Phone Number:This is the local telephone number to be dialed to connect to your ISP.
Login Sequence:This is very dependent on your ISP. If you leave this field blank the Dialer assumes that on connection your ISP will ask for LOGIN: and will respond with the value in the Login ID field, and will then ask for PASSWORD: and respond with the value in the password field. It is almost never this easy though. More then likely you will have to create a special login script to successfully connect to your ISP. If your ISP can't tell you specifically what to do here, you may have to dial into them using a terminal communications program like HyperAccess lite. Use the communication program to dial your ISP's local access number, then write down what textual prompts you are asked and your responses. A script is a series of send-receive text lines. In my case I use the following script:
\r
name:
[LOGINID]
word:
[PASSWORD]
ptd.net>
PPP
Your\sIP\saddress\sis\s[$IPADDR]
The first line '\r' sends a newline to my ISP to get it's attention.
Then my ISP responds with a text prompt that ends with the word 'name:'
The dialer then responds with the value in the Login ID field, [LOGINID]
Then my ISP responds with a text prompt that ends in the word 'word:'
To which the dialer responds with the value contained in the Password field, [PASSWORD]
Then my ISP displays a command prompt that ends in 'ptd.net>'
And the dialer sends 'PPP', because I want a PPP connection
Finally my ISP responds with connection information. Since I don't have a static IP address, the dialer obtains that information by scanning the connect information until it finds the assigned IP address after the string 'Your IP address is '. The dialer stores the dynamic IP address in the [$IPADDR] field. Again if you have a static IP address you won't need this line. Notice that the spaces in the actual script are replaced by '\s'. Also note that all of this is case sensitive, so not only do you have to spell things correctly, you have to use upper and lower case exactly as it is required.
Connection Type:This will be either SLIP or PPP. Again your ISP will tell you what kind of connection you will have.
Inactivity Timeout Option: Here you can specify the amount of time that nothing is done before the connection to your ISP will be automatically closed by DOIP. Enter a number in minutes and can have the following values 120, 90, 60, 30, 15, 10, 5 or OFF. Set OFF to disable this function.
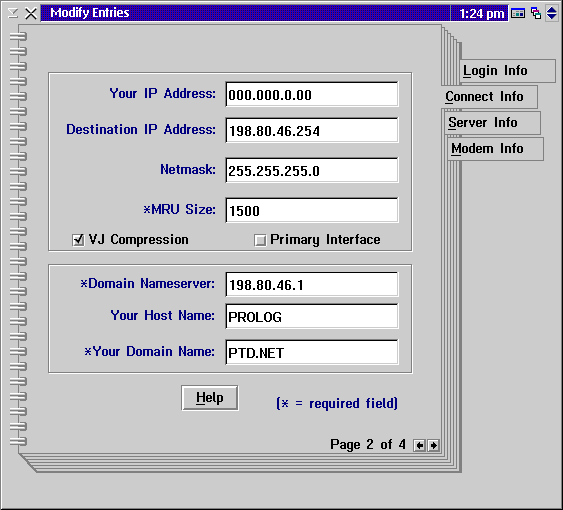
Your IP address:If you have a static IP address (that is it is always the same) enter it here, otherwise enter 000.000.0.00
Destination IP address:This is the IP address of your ISP.
Netmask:Unless your ISP tells you otherwise this should be 255.255.255.0.
MRU size:This is usually 1500, but if your ISP tells you otherwise change it.
VJ Compression: Van Jacobson header compression. Generally this is checked (that is the default is to use VJ compression.
Domain Nameserver:You have to obtain this from your ISP.
Your Host Name:This is a symbolic name assigned to your computer. It should be obtained from your ISP.
Your Domain Name:This is a multi-part textual address assigned to your ISP. Each part is separated by a period '.'. In my case it's ptd.net.
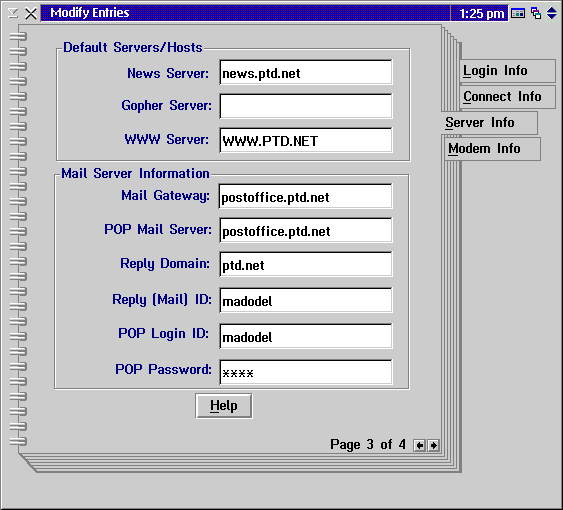
Default Servers/Hosts
News Server: Your ISP will be able to tell you what News Server host name or IP address. You need this to access news groups with a news reader.Mail Server Information
Gopher Server:Your ISP may or may not know of a gopher server to use. Gopher is an older internet file retrieval protocol and isn't as popular as it once was.
WWW Server: Your ISP should be able to tell you what default WWW server host name to use.
Mail Gateway: This is the server that routes the mail to you. This has to be a host name not an IP address. Your ISP will give this to you.
POP Mail Server: This most likely will be the same as the Mail Gateway. Again you have to get this from your ISP.
Reply Domain: This is the part of your e-mail address without your user ID and the @ symbol. My e-mail address is madodel@ptd.net. My Reply domain is ptd.net.
Reply (Mail) ID: This is the identifier you use to send and receive mail. It's the first part of your e-mail address.
POP Login ID: This is the ID assigned to you to login to the POP mail server. In most cases it should be the same as your Mail ID.
POP Password: This is the password you need to sign into your POP mail server. Unless your ISP tells you differently it's most likely the password you use to sign on to your ISP's service.
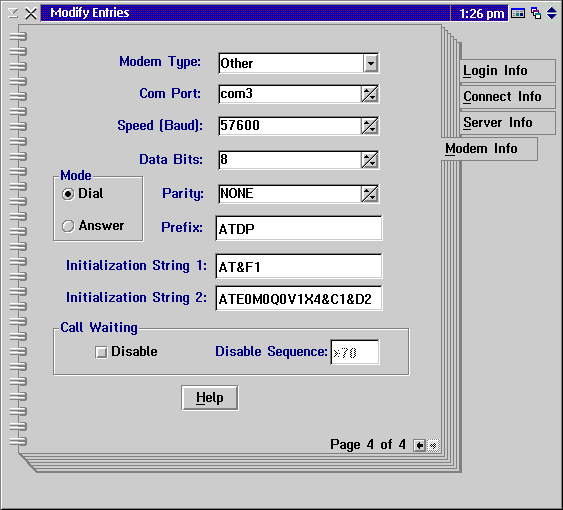
Modem Type: Unless you are using one of the many modem types listed, this may be your most daunting task. Try to find one that is similar to the modem you are using. For example if you have a USR Sportster 28,800, try the Sportster 14,400.
Com Port: Select the serial port used by your modem. The default is COM1.
Speed: Specify the speed of the connection. This may be equal to or less than the capacity of your modem. The default speed is 9600. speed is the async-to-modem bit rate (1200 to 115200).
Data Bits: Specify the number of data bits in each character sent or received. Valid values are 7 and 8. The default is 8.
Parity: Specify the parity of the connection. A parity bit is appended to a group of binary digits to cause the sum of the digits to be either even or odd. This parity bit is used in parity checks and should match the setting of the receiving modem. Valid values are none, space, mark, even, and odd. The default is NONE.
Mode: Unless there is some reason you want to have your system receive rather then initiate the phone connection leave this set at Dial.
Prefix: This is a modem command that tells your modem how to dial the phone number. ATDT means to use Tone dialing and ATDP means to use pulse dialing.
Initialization String 1: This is a string of one or more modem commands to configure the modem. If you don't have one of the listed modems, the safest string to start with is AT&F1. This is the Hayes compatible command to tell the modem to use Hardware flow control. All Hayes command strings begin with AT.
Initialization String 2: Like String 1, this is a continuation of modem commands to configure the modem. You may or may not have anything in this field.
Call Waiting: Leave this unchecked unless you have call waiting on your phone line. If you do have call waiting then check the disable box and enter the tone sequence needed to disable this feature. this will prevent an incoming call from hanging up or otherwise interfering with your modem connection.
Top
IBM Web Explorer The World Wide Web browser included with OS/2 Warp is IBM's Web Explorer. It is adequate, but since it is no longer being actively developed, it is becoming more and more out of date. The Web Ex does not do frames nor does it accept Netscape plugins, so it is very limited when it comes to surfing the web. IBM is still releasing new versions that fix known bugs though. For the latest version of IBM's Web Explorer see http://www.networking.ibm.com/WebExplorer/
Top
Netscape Communicator for OS/2
You can get the latest version of Netscape's Communicator for OS/2 from IBM's Software Choice site - http://service.boulder.ibm.com/asd-bin/doc/en_us/catalog.htm. This site has links to both the International (40bit encryption version) and the Strong Encryption version (128bit encryption version available only to residents of the US and Canada). There are also links there to download the Netscape Navigator for OS/2 2.02 version as well.
A version of the 128 bit version is available for download at ftp://ftp.replay.com/pub/crypto/browsers/128bit/IBM-OS2 This is not an IBM site, and is actually located outside the United States. If you are in North America it is advisable to download or order this from the IBM site above, just to demonstrate the demand for OS/2 native applications. In addition, there is fortify for patching the International version executable to provide 128 bit encryption support (http://www.forify.com).
The current version is the IBM port of Netscape's 4.61 version of Communicator which includes Navigator, Composer, Messenger, and Collabra. For an overview of this product you can look at IBM's Netscape Communicator for OS/2 page - http://service.boulder.ibm.com/asd-bin/doc/en_us/ns40/f-prod.htm. Though it is versioned as 4.61 because of IBM's contract with Netscape, it actually includes some items from the higher versioned, non-OS/2 releases as well as a few fixes for bugs in those other versions. This version of Communicator was ported to OS/2 by a team of IBM programmers, using Netscape's source code.
A page devoted to Communicator/2, with problem status reports and tips is Steve Wendt's Communicator for OS/2 Bug-Tracker site http://www.os2.com/os2news/Communicator.html.
Netscape Navigator for OS/2, 2.02
IBM and Netscape have finally gotten their act together and come out with a version of Navigator for OS/2. Officially it's version 2.02E, but it has a lot of the features of 3.0. As a matter of fact if you add the parameter -3 to the object properties optional parameter field, NSN/2 will report itself as version 3.0 in it's user agent. This is the information web servers use to determine what features your browser is capable of using. Also supports Drag'nDrop. That is you can drag a URL to the desktop and it will create a URL object. You can then drag the object to NSN/2 and it will go to that site. Another nice feature is that you can just key in a domain name into the URL location and NSN/2 will fill in the rest. Key in ibm and NSN/2 will go to http://www.ibm.com. It defaults the http://www. and .com portions of the URL. Of course this won't work for non-standard URL's, but it works with many. To get the latest version of Netscape Navigator for OS/2 ( and hopefully soon the Netscape Communicator for OS/2) http://service.boulder.ibm.com/asd-bin/doc/en_us/ns202/f-feat.htm/
For old information on Netscape Navigator for OS/2 2.02 checkout the Netscape Navigator for OS/2 Warp Unofficial Home Page. This site also has the latest plug-ins and helper applications. Also checkout the Netscape Navigator for OS/2 Warp - plugins hints and tips.
Top
FTP Host One of the neatest of the applications in the Warp 4.0 IAK is the FTP Host. It extends the internet to your desktop by creating a folder that will display all the files and directories on the remote ftp site as if they are on your own hard drive. You can then transfer files rather painlessly by dragging and dropping them with your computer's mouse. To use this app, you have to first open up the folder labels Templates for the Internet. Look for the icon labeled 'FTP Host' and then click the right mouse button (RMB) and drag the image to your desktop or your IAK folder or anyplace else you want to set up an ftp folder.
Now a property notebook will open up. Enter the required information which includes:
Host Name: This is the URL of the ftp site you want to connect to. It will also be used as the name of the object you are creating.
User Name: This is usually the word anonymous unless you are accessing a controlled ftp site, in which case use your assigned user id.
Password: This is usually your e-mail address, unless again it's a controlled ftp site, in which case you would enter your own password.
Account: use this field to enter any required account information, but usually this is left empty.
Finally you need to select the default file transfer method. If the site is mostly, or all text files, then select ASCII otherwise leave the default set to binary. A lot of people who have problems with files they have downloaded from the internet have usually selected the wrong file transfer type. All zipped and executable files, as well as all graphic images should be downloaded as binary files.
By clicking on '+' in the upper right hand corner of the Host tab page, you will get a second setting page that will allow you to enter a preferred remote directory to switch to once connected and a preferred local directory for downloading files to.
If you don't enter any of the above parameters, then when you click on the ftp host object a screen will pop up asking you for the first four items. if the first three items are already set then the ftp host folder will open and display all the remote files as icons as soon as the connection is made. You can now move files back and forth (depending on your access privileges of course) between your system and the ftp remote site. You can also select any of the objects just like any OS/2 items , and then click the RMB to get a pop up menu allowing you to perform different functions, like get (to download files) or delete from host. If you click the RMB on the folder background you will get a different pop up menu. This menu includes most of the usually OS/2 folder menu items like properties, arrange, sort, create another, etc, as well as several specific to the ftp folder. These include Query Host which will return a brief description of the remote sites environment; Ping - which will return a value of the approximate time it takes to get data from the remote site; Set ASCII or Set Binary - which allows you to switch the file download type; PWD - which will show the current directory on the remote host you are connected to. In addition if you select the Open Host as menu choice you can choose to have the remote files listed in Tree View, Detail View, or to open a command line FTP session or finally a Telnet session.
Top
Telnet OS/2 Warp includes a couple of Telnet clients - There is the command line telnet.exe and there is the GUI telnetpm.exe. These are both found in your c:\TCPIP\BIN directory.
telnet.exe is a command line telnet client. Once you start it you have to key in the commands to login to your telnet host and to configure your client. The following commands apply:
open Connect to a site
close Close current connection
quit Exit telnet
status Print status information
help or ? Print help information
send Transmit special characters
emulate Specify an emulator type (vt220, vt100, ansi, hft, nvt)
set Set operating parameters
toggle Toggle operating parameters
display Display operating parameters
environ Change enviroment variables
To just login to particular site using the defaults just type at an OS/2 command prompt telnet site.name.net. If you don't specify a host address, you will get the telnet command prompt. At this prompt you can execute any of the above commands. There are a number of command line parameters to configure your telnet session.
-d filename Sets a debug file to use
-l filename Sets a file to use for logging
-cp codepage Sets the codepage to use
-f config Specifies a configuration file to use
-u colorSpecifies what color to set the underscored characters
-k keyboard Specifies which national keyboard to use.
-o printer_port Specifies what printer port to use
1
North America(default)
15
Spanish
2
British
16
Japan
3
Flemish
17
Korea
4
French Canadian
18
Taiwan
5
Danish
19
PRC
6
Finnish
20
Portugal
7
German
21
Brazil
8
Dutch
22
Hebrew
9
Italian
23
Arabic
10
Swiss (French)
24
Poland
11
Swiss (German)
25
Czechoslovakia
12
Swedish
26
Turkey
13
Norwegian
27
Russia
14
French/Belgian
-
-
-h height Sets screen height (25, 43, or 50)
-w width Sets screen width (can be 80 or 132)
-e envlistSets environment variables in the form of name=value;name2=value2;
-p port Specifies a remote host port to use.
-t termtype as listed above the selections are VT220, VT100, ANSI, HFT and NVT
-N Tells telnet to ignore the 8th bit of data when in 7bit VT220 mode.
telnetpm.exe is the GUI PM interface version of telnet. Instead of using the command line, you use menus to login and configure the telnet session. On the Host connection window you can enter a host address, host telnet port (if none given defaults to the standard 23), emulation type and the screen width/height.