


 Feature articles

Active GUI element
Static GUI element
Code
WPS object
File/Path
Command line
Entry-field content
[Key combination]
How to Create a Database Using Lotus Smartsuite
Part 6
Arthur van Egmond lives in the Netherlands. He is married but doesn't have any children yet. He works for the government in the department of Social Security and his main job is to keep the client computers up and running. His first experience with OS/2 was with version 2.1. Since then he upgraded to eCS 1.2. He owns or at least has seen nearly all versions.
Welcome back. Thanks for joining me in our tour through creating a database using Lotus Smartsuite. Today we finish our main database Movies.
Over the past issues we have created a great deal of our database.
We have the forms input (which is not completed yet), list, extra info, dvdregion, help (which is not completed yet), find (which is not completed yet), print (which is not completed yet), actors, sort (which is not completed yet), and explanation.
So what remains to do?
Let's start by creating two empty reports. Then we finish the incomplete forms. We continue with joining our databases so we can actually use them, adjust some of the fields in the input form, and finally create our reports.
Apparently, there is a lot of work to be done.
On with the Show
Create a report Printlist:
- Set the page format to A4 Landscape.
- Set the following margins:
Table 1. Report Printlist, margins Margin Value Left 0.5cm Right 0.5cm Top 1.0cm Bottom 1.0cm
Create a report Printcard:
- Set the page format to A4 Portrait.
- Set the following margins:
Table 2. Report Printcard, margins Margin Value Left 0.5cm Right 0.5cm Top 1.0cm Bottom 1.0cm
On the Input screen, create a button with the following parameters:
| Parameter | Value |
|---|---|
| Width | 2.50cm |
| Height | 0.50cm |
| Top | 8.00cm |
| Left | 0.36cm |
| Macro | Sort |
On the Input screen, create a second button with the following parameters:
| Parameter | Value |
|---|---|
| Width | 2.50cm |
| Height | 0.50cm |
| Top | 13.0cm |
| Left | 0.36cm |
- Create a macro Internet with the command Open
- Click on Files and browse to the location of your web browser.
- Delete the path in front of the .exe file.
- After the .exe file add http://imdb.com.
Note: Don't forget that you need to adjust PATH, DPATH and LIBPATH in your CONFIG.SYS, e.g.:
SET PATH=X:\[Directoryname], where X is the driveletter where you have installed your browser, and Directoryname is the path to your browser location. In my case it is either X:\Internet\Mozilla or X:\Internet\Firefox. (I have not decided which browser to use as default yet :-))
On the Help form, create a button, and use the macro Close1.
On the Print form, create three buttons:
| Button | Width | Height | Top | Left | Color | Macro |
|---|---|---|---|---|---|---|
| Printcard | 0.5cm | 0.5cm | 1.25cm | 4.5cm | background | create: printcard, view - switch to printcard / printpreview / zoom - to actual size )* |
| Printlist | 0.5cm | 0.5cm | 2.5cm | 4.5cm | background | create: printlist, view - switch to printlist printcard / printpreview / zoom - to 85% )* |
| Close | 2.5cm | 0.5cm | 6cm | 0.25cm | - | Close1 |
On the Sort form, create five macros:
| Name | Command | Top | Left |
|---|---|---|---|
| Sorttitle | sort: Select title and click add. Use view - switch to input, and click OK. | 1.25cm | 6cm |
| Sortgenre | sort: Select genre and click add. Use view - switch to input, and click OK. | 2cm | 6cm |
| Sortyear | sort: Select releaseyear and click add. Use view - switch to input, and click OK. | 2.75cm | 6cm |
| SortID | sort: Select MovieID and click add. Use view - switch to input, and click OK. | 3.5cm | 6cm |
| Close | use macro close1 | 6cm | 0.25cm |
For the sort buttons, use the same kind of buttons that we created on the Print form. The close button is still the same like all other buttons.
On the Find form, change the new macro for new1 by creating a new macro with the following parameters:
- View - switch to find
- Find - All records
- Find - Go to find and wait for input
Add the sort, internet, actors, and extra info buttons. Use the same location and style as on the Input form.
The Gathering
Now that all our forms are complete, we join our databases.
- In the menu select Create > Join. You see a window and in this window is a list with all fields of the current database you can use to join with another database. As you can see these are not all the fields in the database. This means that with the other fields you cannot create a join.
- Now click on Open, browse to the location where you have saved your other databases, and select Contacts.
- In Movies, click on borrowedto and in Contacts click on combined.
- Click the button Join.
- Open the database Dvdextra and create a join for the fields Dvdextra in Movies and Dvdextra in Dvdextra.
- Do the same for Genre and Dvdformat.
- When you are finished and there are no more joins to be made, click OK.
We now have succesfully joined our databases, but we still cannot use them.
- Select the Input form.
- Select the field Genre.
- On the Basic tab of the properties box, under Datatype, select fieldbox and list.
- Click the Options button.
- Under Fields to create list from select Genre.
- Under Genre make sure Genre is selected.
- Click OK.
- Now do the same for the fields Dvdformat, Dvdextra and Borrowedto. Be careful that you select the right database under Options and that you select the right field in that database.
Basically, we are finished.
Sort and Menu
Now let us add a default sort to our database:
- Click File > User Setup > Approach Preferences
- On the second tab (Order), select Title and click Add
- Click OK. Now every time you start this database, it is automatically sorted by the title field
Okay, I forgot that we need to create another macro: My Menu
- Create a macro My Menu
- Select the command menu switch
- Copy the Short Menu and name it My Menu
- Edit My Menu
- Delete Menu and Files (&File)
- Delete Standard Menu (&Edit)
- Delete Standard Menu (&View)
- Delete MacroList
- Delete Window Menu
- From the Standard Menu (&Help), delete all items in the right pane except:
- Help Topics
- About Lotus Approach
- Click on Add Menu, under Menu name type &Cover
- Click on Add Item, select Import picture, item name Import Cover
- Click on Add Item, select Export picture, item name Export Cover
- Click OK
- Click Done
- Click OK
- Click Done
On all tabs, select My Menu as menu bar using the Basic tab in the properties notebook.
Okay, I just have noticed one or two things. Change the field labes of:
- Dvdextra to Dvd Extra
- Dvdformat to Dvd Format
- Borrowedto to This movie is lent to:
- MovieID to Movie ID
- Numberofdisks to Number Disks
- Change the size of the cover to a width of 2.5cm and a height of 3.5cm
- Set the field MovieID to readonly
Reporting
Now let's create the reports to complete our database.
The List
The first report we are going to make is Printlist.
I did some work for you by creating this picture:
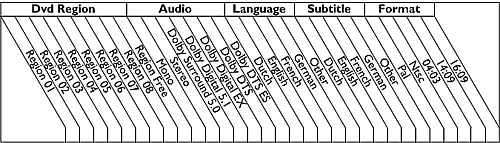
Fig. 1. Image to insert into Printlist report [Larger image]
![[Larger image]](english-printcard.png)
-
Add a header to the report and place this picture in the right corner of the header. Use the following dimensions:
Table 7. Printlist report, image dimensions Parameter Value Width 14cm Height 4cm Top 1cm Left 13.5cm - Resize the body to the bottom of the page so we can use as many lines as possible.
Again we have a problem that not all the fields fit on this report. Therefore I added the most important fields:
| Field name | Width | Height | Top | Left | Font | Property |
|---|---|---|---|---|---|---|
| MovieID | 1.75cm | 0.5cm | 5.25cm | 0.61cm | Gill Sans 10 | Read Only |
| Title | 6.00cm | 0.50cm | 5.25cm | 2.40cm | - | Read Only |
| Genre | 5.00cm | 0.50cm | 5.25cm | 8.47cm | - | Read Only |
| Time | 1.75cm | 0.50cm | 5.25cm | 13.51cm | - | Read Only |
Set all the fields mentioned in the picture to checkbox and use Gill Sans 10. This time, use a flat checkbox with the parameters:
| Parameter | Value |
|---|---|
| Width | 0.50cm |
| Height | 0.50cm |
| Top | 5.25cm |
| Left | 15.35cm |
Don't forget to type Yes under Checked value.
Align all other checkboxes to the position where the text from the picture stops. They all have the same top offset, only the left position is different.
As you can see I chose the most important fields concerning the movie. This list we can keep near our DVD player to lookup a certain movie if we want to see it.
Now that the nasty work is done (all those checkboxes were quite some work, weren't they?), we can focus on what title we want in the header. We also need to add two buttons. And we can add the current date with the text Printed on: in front of it, plus a page number.
As title, use My Movies and the following parameters:
| Parameter | Value |
|---|---|
| Width | 9.00cm |
| Height | 1.50cm |
| Top | 1.00cm |
| Left | 2.13cm |
| Font | Gill Sans 36 Bold |
| Style | none |
| Fill color | none |
| Border color | none |
Under this create two textboxes:
| Text | Width | Height | Top | Left | Options |
|---|---|---|---|---|---|
| Print this list | 3.50cm | 0.50cm | 3.00cm | 0.75cm | Non printing, Show in printpreview |
| Return to input screen | 3.50cm | 0.50cm | 3.50cm | 0.75cm | Non printing, Show in printpreview |
Now create the following two buttons:
| Button | Width | Height | Top | Left | Options | Macro |
|---|---|---|---|---|---|---|
| Top | 0.5cm | 0.5cm | 3.0cm | 4.5cm | Non printing, Show in printpreview | print1 (Command-Print) |
| Other | 0.5cm | 0.5cm | 3.5cm | 4.5cm | Non printing, Show in printpreview | Close1 |
Add the following text:
| Text | Width | Height | Top | Left |
|---|---|---|---|---|
| Pagenumber | 3.50cm | 0.50cm | 4.00cm | 0.75cm |
| This list is printed on | 3.50cm | 0.50cm | 4.50cm | 0.75cm |
And finally add the following functions:
| Text | Width | Height | Top | Left |
|---|---|---|---|---|
| pagenumber | 2.50cm | 0.50cm | 4.00cm | 4.50cm |
| current date | 2.50cm | 0.50cm | 4.50cm | 4.50cm |
Now that our list report is finished, we can continue with our card report.
The Card
Again, it is a lot of work to set all fields into place. As we did in the contacts database, we will not use a header. Again, we create two cards on one page, therefore we need to draw a line so we can position the body:
- Resize the body to somewhat over the half of the page.
- Draw a hairline with a width of 20.5cm and start at a top offset of 13.5cm.
Now we can resize the body again so it lines up with the hairline. If the hairline disappears, you have to resize the body again. Check the top offset of the hairline, this changes automatically if you make the body too small. Continue to change the body size and the top offset of the hairline until they line up. That's good, now the body is exactly half of the printing area. When you add more records, Approach shows two records on one page, and if you can print double-sided, you even save more paper. :-)
Now let's add some fields and position them. Use Gill Sans 10 for the font. Make all the fields read-only.
We start with the cover.
Put the cover into position:
| Parameter | Value |
|---|---|
| Width | 2.5cm |
| Height | 3.5cm |
| Top | 2.0cm |
| Left | 1.0cm |
For now we use a hairline as border just to know where the location is. Later, when all fields are in place, we remove the border. I think it looks better without a border.
Place the fields at the following positions:
| Field name | Width | Height | Top | Left |
|---|---|---|---|---|
| title | 6.0cm | 0.5cm | 2.0cm | 4.5cm |
| genre | 6.0cm | 0.5cm | 2.0cm | 11.0cm |
| numberofdisk | 2.5cm | 0.5cm | 2.0cm | 17.5cm |
| dvdextra | 2.5cm | 0.5cm | 3.0cm | 4.5cm |
| dvdformat | 2.5cm | 0.5cm | 3.0cm | 8.0cm |
| time | 2.5cm | 0.5cm | 3.0cm | 11.0cm |
| releaseyear | 2.5cm | 0.5cm | 3.0cm | 14.5cm |
| actors01 | 6.0cm | 0.5cm | 4.0cm | 4.5cm |
| actors02 | 6.0cm | 0.5cm | 4.0cm | 11.0cm |
| actors03 | 6.0cm | 0.5cm | 5.0cm | 4.5cm |
| actors04 | 6.0cm | 0.5cm | 5.0cm | 11.0cm |
| movieID | 2.5cm | 0.5cm | 6.0cm | 1.0cm |
| actors05 | 6.0cm | 0.5cm | 6.0cm | 4.5cm |
Draw a hairline under all the fields with the same width and a top offset of T=3.55cm, T=4.55cm, etc. We can now remove the hairline around the cover field. Later in this position we see the cover we have imported into the database.
So much for the easy part. As you can see, I didn't insert the memo fields, the imdbcode field, and the borrowedto field into this report. You can if you want, but why should you? If you do it means that everytime there is a change in the record for the borrowedto field, you should reprint this page. The imdbcode field is just a quick option to see more about this movie so this also adds no value to the record since you need the computer to get to the IMDB site.
Now for the hard part. We add all the region, audio, language, subtitle, and format fields in the remaining space. Also, we need to add two non-printable buttons with text labels.
Well, it's not so difficult, only a lot of work. :-) For all lines we use a hairline and of course we use Gill Sans 10 for the font.
Draw a rectangle with the following parameters:
| Parameter | Value |
|---|---|
| Width | 9.0cm |
| Height | 1.5cm |
| Top | 7.5cm |
| Left | 1.0cm |
Draw two horizontal lines with the following parameters:
| Line | Width | Top |
|---|---|---|
| 1 | 9.0cm | 8.0cm |
| 2 | 9.0cm | 8.5cm |
Draw a textbox with the text Dvd Region:
| Parameter | Value |
|---|---|
| Width | 9.0cm |
| Height | 0.5cm |
| Top | 7.0cm |
| Left | 1.0cm |
| Justification | centered |
| Font weight | bold |
Draw two text boxes:
| Text | Width | Height | Top | Left |
|---|---|---|---|---|
| 01 | 1.0cm | 0.5cm | 7.5cm | 1.0cm |
| 02 | 1.0cm | 0.5cm | 7.5cm | 2.0cm |
For the second box, use a borderline on the left and right side only.
Now all uneven numbers look like textbox01 and all even numbers look like textbox02. The last box contain the text Free. (Remember that we had regions 1 to 8 and region free.) This box looks like the 01 box.
Under the numbers we put the fields as checkboxes at the following positions:
| Checkbox | Width | Height | Top | Left |
|---|---|---|---|---|
| 1 | 0.50cm | 0.50cm | 8.50cm | 1.25cm |
| 2 | 0.50cm | 0.50cm | 8.50cm | 2.25cm |
| 3 | 0.50cm | 0.50cm | 8.50cm | 3.25cm |
| 4 | 0.50cm | 0.50cm | 8.50cm | 4.25cm |
| 5 | 5.25cm | 6.25cm | 7.25cm | 8.25cm |
Don't forget to make all the fields read-only.
We create the other fields and boxes the same way:
| Box | Width | Height | Top | Left | Text |
|---|---|---|---|---|---|
| Audio | 7.0cm | 1.5cm | 7.5cm | 11.0cm | Mono, Stereo, Ds 5.0, Dd 5.1, Dd-EX, D-Dtd, Dts-ES |
| Language | 5.0cm | 1.5cm | 9.5cm | 1.0cm | - |
| Subtitle | 5.0cm | 1.5cm | 9.5cm | 7.0cm | - |
| Format | 5.0cm | 1.5cm | 9.5cm | 13.0cm | - |
If you see a little distortion in the rectangle, select all checkboxes, click with the right mouse button on one of the boxes and from the popup menu select Arrange > Send to back.
With all the text and fields in place we only need to add two buttons. Again we make sure that these buttons and the text in front of these buttons show up in our output. So select the Non-printable and Show in print preview options.
Place the following text boxes:
| Box | Width | Height | Top | Left |
|---|---|---|---|---|
| Print this card | 3.5cm | 0.5cm | 11.5cm | 1.0cm |
| Return to input screen | 3.5cm | 0.5cm | 12.0cm | 1.0cm |
Add the buttons and line them up with the text. (Remember you can use your style.) Apply the macros printcard and close1.
Okay. Congratulate yourself for achieving this goal. For as far as my knowledge goes we have done all we needed to. Now it's time to test our databases to see if everything works.
1, 2, 3, Testing. . .
Before you do your testing, make a backup of your empty databases. If you do so, you can later delete your databases and start using the empty ones without having to delete all records and resetting the counter.
Let's add two records to our Contacts database. Just use fake names, or if you please, use real names. :-)
Okay, I found the first problem. The fields for the telephone numbers are not correct. I have to add two more numbers but this is not possible. So let's adjust the fields.
Now maybe you wonder how can I adjust the fields? We have stripped all contents of the menu. Well, maybe you have seen them, the keybord short-cuts. Press [Ctrl-D].
In the toolbox, click on the Fields button and select Field definition. Let us change the number to 18 for the
telephone fields. Click OK. Now I'm not pleased with that format either. The
country code for the Netherlands is 031 but I did not see the leading zero. This is due to the # in the
field definitions. Let's change the field definition to this:
>6 (000)" "000-000000|=6 000-000000
Of course, you can adjust this field for you own country. Now for the FAX number we can use the same layout, so adjust the format for the FAX number as well.
Explanation: Between the brackets is the country code, then we get the area code without the leading zero and finally we get the phone number. As far as I know this international standard. Correct me if I'm wrong.
As far as the cellphone number is concerned it would look like this in the Netherlands:
>6 (00)" "00-00000000|=6 00-00000000
Now for the cellphone number you normally don't put the leading zero in front, so it would be the country code without the leading zero and then the whole cellphone number.
Anyway, if you want to, you can skip the country code but for me, with an international family this is a bit difficult. If you don't want any trouble at all, adjust to numeric-general, then you can type anything you like, as long as they are numbers.
Click on View > Show taborder. Now you can see a lot of numbers appear. Change the value 17 on the homepage field to 15. Automatically, all following fields are adjusted as well. Select View > Show taborder to toggle the taborder off.
I'm satisfied now. Press [Ctrl-B]. Click Close and Yes to save the changes. Now add some records in the databases Genre, DvdExtra, DvdMedia.
For now it's not important what the contents are. If you use the [Tab] key, Approach creates a new record for you every time you tab out of the last field.
Now that we have filled the databases let's go to our main database Movies.
I did notice a few things in this database as well. The actor fields do not start with a capital letter. This is handy so you don't have to use the [Shift] key all the time. Let's adjust the fields to First Capitalized.
After you have pressed [Ctrl-D], you have to select View > Show viewtabs. I noticed that the macros PalNtsc and NtscPal are not working for me.
Okay, I have looked into this and I think it's not working for you either. Let's adjust the two macros so they work like we expect.
- Select the macro NtscPal and click Edit
- For Command use SET
- For Using database enter Movies
- As Field select FormatPal
- For To this value enter not movies.FormatNtsc (remove all other content)
- Click OK
- Select the macro PalNtsc and click Edit
- For Command use SET
- For Using database enter Movies
- As Field select FormatNtsc
- For To this value enter not movies.FormatPal (remove all other content)
- Click OK
- Click Done
- Press [Ctrl-B]
- Click Close
- Click Yes to save the changes
When you open the database again, you can see that the switch is working now.
Read, Set, Go. . .
You can now replace your test databases with the empty ones.
You can use the following records in the databases:
| Database | Records |
|---|---|
| DvdMedia | DVDROM, DVD+RW, etc. |
| DvdExtra | Complete, Movie Only, etc. |
| Genre | Action, Adventure, etc. |
If you do it like this you only have to type it once, you can select the appropriate record in the Movies database.
Conclusion
Okay, this ends our trip through Approach. I hope you enjoyed creating these databases and, of course, you can expand them by creating even more databases. Maybe you have a large MP3 collection or a large number of books. Think about compact disks or other media like LP or Minidisk.
For those who tried really hard but did not quite get the feeling, it could be my explanation of things, but if you really want to use these databases, there is some good news: the complete set is available.
I take this opportunity to thank my dear friend Michel who helped in creating and modifying these databases to what they are today.
Maybe we will meet again.