BackAgain/2000 Server Edition version 3.0 - A Review, Part 3
Introduction
In the previous
article in this series we covered the basics of backing up your system. In this
month's article, we'll look at restoring your system or individual files thereon,
including the disaster recovery process.
Basic Restore Process
To begin a Restore process, double-click on the BackAgain/2000 icon to start
the program, and click on the "Restore" button on the main window. (If
you prefer, you may also use the menus, and select File | Restore; however the result
is identical.) The resultant Restore Window is displayed below:
-
Catalog Library Structure
Before we can look at the Restore, or "Open Catalog", Window in detail,
we would do well to examine the structure of the BackAgain/2000 catalog library.
When you make any kind of backup using BackAgain/2, the software creates a catalog
of the files backed up. This catalog contains the following information:
-
The complete filename of each file backed up, including: device, filename, directory
name;
-
Auxiliary file information including regular and extended file attributes, and for
HPFS386 and JFS filesystems, access control lists;
-
Location on the media where each file was stored;
-
Number of the media within the set where the file was stored.
-
The information in c: and d: is used when you want to restore a few files quickly.
Because BackAgain/2 records the location to which each file was written, and because
modern tape drives are "smart"¹,
BackAgain/2000 can issue a command to the tape drive telling it to go directly to
the block it wants, thereby saving an enormous amount of time compared to
previous technologies. When the backup is complete, and the Archive bits have been
set, the catalog is written out to the backup device. (For tapes the catalog is
written at the end, not the beginning of the tape as with some other backup
software.) A copy is also written out to your hard drive in the Catalogs subdirectory
of your BackAgain/2000 directory.
-
Another characteristic of the catalog structure is that catalogs are bundled together
to form a group of catalogs. (Another way of looking at this, is to say that catalogs
are appended to each other.)² If BackAgain/2000
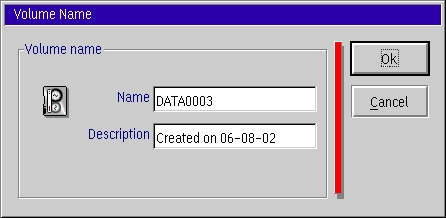
begins a backup and finds an blank media, it begins a new catalog. You will know
it is doing this because it will display the following screen:

-
Each catalog for the successive backups (usually differential or incremental backups)
will be stored as part of this file. It is important to note, however, that the
criterion for stopping one bundle (i.e. volume) and starting a new one is NOT the
type of backup performed, but whether the backup device is blank (i.e. empty). This
may raise a question in the thoughtful reader's mind: "What happens if the
catalog is at or very close to the end of the current tape when you want to start
another backup set (e.g. differential backup) so that BackAgain/2000 has to go a
new tape? Well, in my experience this is one flaw in BackAgain/2000's design and
has been present for several generations of the product. BackAgain/2000 seems to
get confused, generates a device error and often corrupts the existing catalog.
Fortunately, this doesn't happen very often. If it does happen to you, BackAgain
provides a simple method of recreating the catalog, which I'll describe later in
this article. Once that is done, you can manually start a new backup on the new
tape.
-
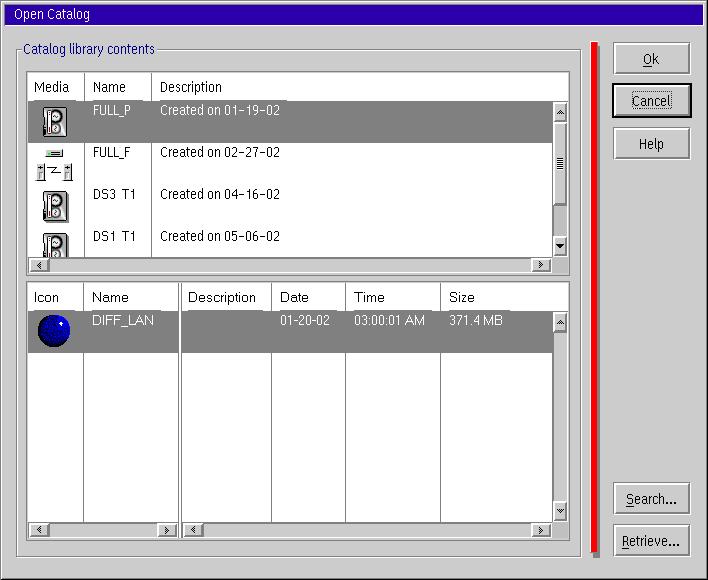
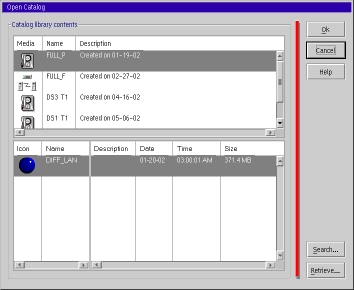
Now we're in a position to examine the Restore Window in detail. The upper window
is simply a graphic representation of each file (i.e. bundle of catalogs) in the
system. This list is read from the hard drive, which explains why it is displayed
almost instantly. It is simple to get a description of the contents of a file: simply
right-click on the file whose contents you wish to examine, and then click
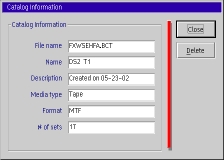
on the "Show info..." menu item. The resulting window is displayed below.
-
You can delete a catalog bundle, by using the same menu and clicking on "Delete".
Since bundles are cumulative, they can grow to be very large: you should keep an
eye on them, off-load them to an Archive device (such as a CD-R) when you no-longer
need them, and then delete them. There is also probably little point in keeping
bundles when the backup data they represent no longer exist: e.g. the tapes have
been overwritten. You should try to practice regular basic housekeeping of the Catalog
directory using the tools provided by this window.
-
Most of the information in the Catalog Information window is fairly obvious. However
there's one point that isn't so obvious, but worth noting anyway. The first entry,
"filename" contains the name of a file in the Catalog directory. If you
go there and look at it you should notice that it has a BackAgain/2000 icon. Try
double-clicking on it: you should find that the Main Restore Window opens!
-
One of the interesting things about BackAgain/2000 is how all the various parts
are linked together; BackAgain/2000 makes good use of OS/2's object oriented technology.
-
A consequence of that is if one of the Desktop objects, say the Schedule Folder,
becomes damaged, the only way to getting it to work properly again is to use the
Install program. I have found that trying to repair things manually is usually ineffective,
and often causes more problems than you had at the start. Even a complete install
does not affect the Catalog, Log, and Sets directories. However it is a good idea
to backup the BAII.CFG file, found in the main BackAgain/2000 directory, before
reinstalling, and then after the install use the backup copy to replace the new
one.
-
You've probably noticed by now that whenever you click on a file in the top half
of the Restore Window, a list appears in the bottom window. That list is a display
of all the SET's included in the file selected in the top half.
-
Double-clicking in the highlighted area (or clicking on the OK button) opens up
what we will call the BackAgain/2000 Main Restore Window for that SET.
-
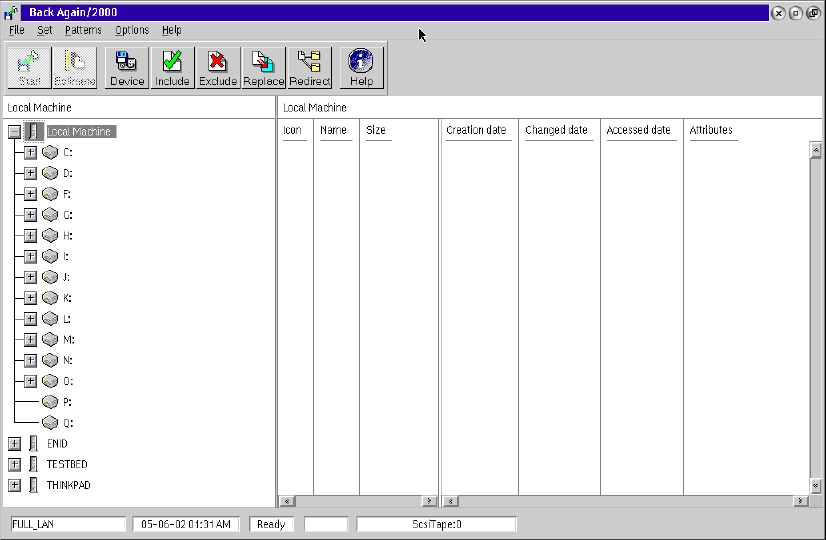
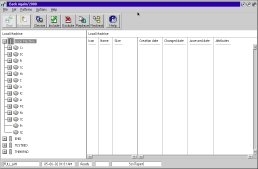
BackAgain/2000 Main Restore Window
-
The Main Restore Window is very similar to the Main Backup Window discussed in detail
in the previous
article in this series.
-
On the left-half of the window, there is a tree-type list of computers (if you are
connected to a network) and for the local machine, a list of hard drives, corresponding
to the SET you selected. (The hard drive list for each of the other computers can
be viewed by left-clicking on the plus sign at the left of the computer icon.) File
information will be displayed in the right-half of the window, once some files have
been selected.
-
Note, however, that no files have been selected yet.
-
You select files by expanding the machines, drives, and, if desired, directories
in exactly the same way as described in the previous
article in this series. You can then select individual or multiple directories
and/or files.
-
Most of the menus and buttons are the same as the corresponding ones on the Main
Backup Window. However there are a few notable exceptions.
-
The File menu does not contain a "Save" item. Theoretically, if you want
to modify the current SET, then you must make the modifications, and then create
a new file using the "Save as" option. However, I have found that you
can save the modified SET by doing a "Save as" and specifying the current
SET filename. However your mileage may vary.
-
The Options Menu contain two items unique to the Restore operation.
-
Overwrite - This option allows you to specify the circumstances under which
BackAgain/2000 can overwrite a file on your hard drive with one with the same directory
and name from the restore media.

As you can see, there are four options: 1. (Always) overwrite existing files;
2) (Always) keep existing files--i.e. never overwrite; 3) Keep the newer file; and
finally 4) Prompt the user. The default is to (Always) overwrite existing files,
and generally produces the best results.
-
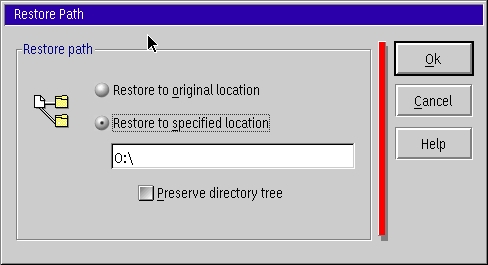
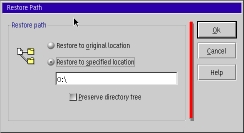
Restore Path - This option allows you to restore files to a location on the
hard drive different from that from which they were backed up. You may specify just
a drive or a complete path. In addition, if you are restoring a higher-level directory,
you have the ability to maintaining the existing subdirectory structure or discarding
it. This option is very useful when re-organizing your hard drives, or replacing
a physical hard drive.
Retrieving a Catalog
As mentioned earlier in this article, BackAgain/2000 creates and maintains two copies
of the catalogs and catalog bundles: one on the backup device itself and another
on your hard drive. To obtain its high speed and efficiency, BackAgain/2000 uses
the catalogs on the hard drive during its operations. Several things, however, can
damage or even erase the hard drive catalogs. The problem in the BackAgain/2000
end-of-volume handling noted above is just one such cause. Other reasons include
hard drive malfunctions, user errors, and power failures. Fortunately, the BackAgain/2000
designers' foresaw this possibility and built a simple solution right into the main
BackAgain/2000 program.
Here's how to make use of it:
-
Go to the BackAgain/2000 Main Window and click on the "Restore" button;
-
Click on the "Retrieve" button, and select the device type;
-
If the "Browse" button is not greyed out, click on it, and select the
file containing the catalog you wish to retrieve.
-
Follow the on-screen instructions.
Tape handling during the restore process has been greatly improved over some
the earlier versions of this product. Provided you properly label your tapes, the
tape handling of the new version of BackAgain/2000 is very nearly foolproof. I highly
recommend you develop a consistent method of labelling your tapes, and then pre-label
them all BEFORE you start doing backups. It will save you much grief over the long
run. In the next article, I will give you some suggestions on labelling methods
and tape-rotation schemes.
Disaster Recovery Restore
-
Hard Drive Restore
-
A little known secret is that the BackAgain/2000 Crash Recovery Hot Start program
can be executed directly from the hard drive. Although it is a VIO, text-based program,
it has full mouse support, making it quite convenient to use.
-
I suggest you iconize the program by creating at least the basic icon in the BackAgain/2000
Desktop folder, making it ready for your use, should the unthinkable happen. It's
also helpful to go into the Sessions tab of the Properties notebook, and click on
"eCS full-screen". It is far more convenient to run it this way than in
a window. Since the Crash Recovery Hot Start program can be run either from the
Desktop or from an ALT-F1 command line, I have found this recovery program to be
all I need 99.9% per cent of the time.
However, if you experience a major wipe-out of your hard disk or the disk containing
the BackAgain/2000, you will need something more basic. For this reason you should
create a set of Crash Recovery diskettes.
-
Creating the System Boot Diskettes
-
Although BackAgain/2000 comes with two utilities to create crash recovery diskettes,
both of them require that you first create a set of system boot diskettes. Recently,
this has become considerably more complex than it used to be because of the number
of changes that have been made to the OS/2 kernel since Warp 4 Fixpak 15, and now
eComStation. In addition there are several versions of eCS in use, and many users
are using Warp Server for e-Business as well. (This is not counting the users still
using Warp 3 and earlier systems.)
-
Basically, however, BackAgain/2000 provides for three types of system boot diskettes.
-
The first is created with the OS/2 "Create Utilities Diskettes" built-in
utility;
-
The second is created using IBM'er Ken Kahn's BootOS2 freeware utility. The latest
version (9.26) is dated November 1999, and that is the one you should use. Mr Kahn
has provided a documentation (.DOC) file that is extremely thorough, yet easy to
understand. You can either download
the zip file from Hobbes, or if you are using eComStation, find it in directory
\TVoice\Wiseprog\BooteCS on the eCS boot drive.
-
Tip: If you create your boot diskettes using BootOS2, be sure to use the
parameter GA400 system designation on the command line.
-
The third option is really a modification of the first. If you are using eComStation,
you can boot from the Boot CD, and use the utility provided by eCS. To do so, just
click on Tools on the menu at the top of the screen.
Which of the above method you choose depends on your own preferences, and your
system configuration. You may have to experiment a little to find the best solution
for you.
-
Using the BackAgain/2000 Utilties
-
Once the system boot diskettes have been created, the next part is simple. You simply
start the utility in the BackAgain/2000 folder the matches the type of system boot
diskettes you have created, and follow the on-screen instructions.
-
The utilities will read the boot diskettes, make some modifications or additions
to the existing files, and then ask for a fourth diskette. The utilities then write
out the BackAgain/2000 Crash Recovery Hot Start program.
-
When finished, you will have another bootable set of diskettes that also contain
the BackAgain/2000 Crash Recovery Hot Start program . When your system or hard drive
goes down, you can simply insert of the first of these diskettes into your floppy
drive, restart your system, insert each diskette in turn, and when you get to the
last one, the BackAgain/2000 Crash Recovery Hot Start program will be started, allowing
you to restore all or part of your system.
This completes our survey of the BackAgain/2000 restore procedures. I hope it
has proved helpful for you, and that you have better learned how to use your copy
of BackAgain/2000.
Next month, we will look at some of the different methods of tape rotation and
tape backup to provide maximum protection of your data.
¹This technology
includes the use of preformatted tapes such as Travan and DAT mini-cartridges which
contain an index of block numbers laid down at the factory. These indices help tape
drives locate blocks very quickly. This preformatting is the reason why such tapes,
unlike their predecessors, must NEVER be bulk erased. A bulk erased Travan or DAT
tape is useless.
²Neither of these
descriptions is completely accurate technically, but thinking of them this way will
help us visualize the relationships involved.
Walter Metcalf has written many articles on the use and usefulness of OS/2 and eComStation. He was widely known as the Guide for the "About.com OS/2" site until its unfortunate plug pulling. Walter has served as President of VOICE and is currently the Co-ordinator of VOICE's Warp Doctor project http://www.warpdoctor.org. You can read more of Walter's articles in the archives of the VOICE Newsletter and many of his previous os2.about.com articles at his personal web site http://www.wmetcalf.com.
[Feature Index]
editor@os2voice.org
[Previous Page] [Newsletter Index] [Next Page]
VOICE Home Page: http://www.os2voice.org