
VOICE Home Page: http://www.os2voice.org
[Newsletter Index]
[Previous Page] [Next Page]
[Feature Index]

VOICE Home Page: http://www.os2voice.org |
April 2003
[Newsletter Index]
|
| By Christian Hennecke© April 2003 |
XFree86/OS2 4.x is available for download from Netlabs. The binary distribution consists of a number of ZIP files which are containing programs, servers, fonts, libraries, include files, man documentation pages and configuration files. The complete distribution requires 55MB space on your harddisk.
The XFree86/OS2 distribution only includes the "core" and no applications and consists of the following packages with their approximate size in brackets:
In comparison to XFree86/OS2 3.3.x, there are no extra X server packages.
In order to save space on your disk and reduce net bandwidth, choose the software to obtain carefully.
Of course it would be best, if you found out whether your particular video adapter is supported by XFree86/OS2 or not prior to downloading all the software. Information on supported chip sets is available at the Driver Status for XFree86 page. This information is also available in several files in the \XFree86\lib\X11\doc\html directory of the distribution, which can be found in the X11.zip archive.
In all cases, please take some time to carefully check the accompanying README.* file in the Y:\XFree86\lib\X11\doc directory for special precautions, options, or features of the card.
In the following we assume that you install XFree86/OS2 on drive Y: in the directory Y:\XFree86. Please adapt the commands and file entries according to your real choice. While naming the directory XFree86 and placing it in the root of the drive was not necessary per se, but strongly recommended for previous version of XFree86/OS2, it is mandatory now! If you don't follow this standard, it may not work! Let's also assume that the XFree86/OS2 distribution's archives reside in a directory X:\temp.
CAUTION: The drive you install XFree86/OS2 to must support long filenames! If you want to use TVFS, do not install XFree86/OS2 4.x onto such a drive, but to the real drive instead, and use TVFS later when all configuration tasks have been finished.
unzip X:\xtemp\*.zip
XFree86/OS2 requires a number of settings in CONFIG.SYS to work correctly. Please add the following changes to your CONFIG.SYS and in particular take care writing paths with slash "/" and backslash "\". You can transfer the settings with cut & paste and then adapt them to your system.
DEVICE=Y:\XFree86\lib\xf86sup.sys
SET TERM=xterm
SET TERM=xterm-color
to add some nice colors. \XFree86\lib\X11\etc\xterm.termcap contains a suitable termcap file for the above definitions, which can be used in place of termcap files which come with EMX, EMACS, or other ported software.
CAUTION: Using this file outside of XFree86/OS2,
e.g. with normal ported Unix applications will most likely result in an unreadable
display. Use e.g. the termcap file which is provided with EMX instead and the following
setting: SET TERM=ansi
On the other hand, with the termcap file from EMX you won't be able to use all keys in an xterm. You can switch between those files and settings by changing them from the command line, running a script before starting XFree86/OS2, or modifying XFree86/OS2's startup files.
SET TERMCAP=Y:/XFree86/lib/X11/etc/xterm.termcap
Note the usage of "/" as path separator.
SET TERMINFO=Y:/share/terminfo
SET ETC=C:\MPTN\ETC
may be set. This setting is OK.
SET TMP=C:\IBMCPP\TMP
SET HOSTNAME=myhost
With the IAK or TCP/IP without a networking card, you should activate the loopback
interface (refer to Network configuration) and set this to
the following: SET HOSTNAME=localhost
SET HOME=Y:\home\myuserid
CAUTION: The directory which you specify here must exist! Otherwise, applications are likely to crash.
SET X11ROOT=Y:
SET DISPLAY=myhost:0.0
Read the X11 man pages for the exact meaning and more options.
For local applications (i.e. ones which are running on the same machine) performance
can be much improved by using the OS/2 pipe transport mechanism. To do so, use either
of the following statements: SET DISPLAY=local/myhost:0
SET DISPLAY=:0
SET XSERVER=Y:\XFree86\bin\XFree86.exe
SET MANPATH=Y:\XFree86\man;Y:\man;Y:\emx\man
CAUTION: xman or man alone might not be sufficient to view the different Unix man pages. You should also install GNU groff (refer to e.g. »Setting up a Unix-like environment« at The OS/2 Files).
SET X11SHELL=Y:/bin/ksh.exe
For more information about this topic please refer to »Setting up a Unix-like environment« at The OS/2 Files.
SET EMXOPT=-h256
If an application crashes or refuses to run without reason, try increasing this number.
Be sure to double-check that everything has been entered correctly. The X server itself will do some checking and will refuse to start, if something is wrong.
It is beyond the scope of this document to even give an introduction to the correct installation of the TCP/IP networking system. You must do this yourself or seek assistance elsewhere. It is only possible to say here that a PC which is working well in a TCP/IP based LAN network will also work with XFree86/OS2 (when all other prerequisites are matched as well). You may want to check OS/2 internet publications like OS/2 eZine, the VOICE Newsletter, or Walter Metcalf's archive of Focus on OS/2 articles.
In any case, you should configure and activate the so-called loopback interface, which can be used for contacting the same machine via network internally. Dependent on the version of OS/2 this can be done differently. Otherwise you will have to establish a network/internet connection and have to fight problems with dynamic IPs.
127.0.0.1 localhost
to the file. This line must end with RETURN/<ENTER>.
SET HOSTNAME=localhost
to CONFIG.SYS. Take care of the connection to the DISPLAY variable.
SET USE_HOSTS_FIRST=1
That way the file hosts is searched first upon resolving domain names instead of immediately connecting to a domain name server.
If you use Warp 3 and the IAK, add the following line to the file \tcpip\bin\tcpstart.cmd:
ifconfig lo 127.0.0.1 up
On Warp 3 Connect and Warp 4 machines the file is called \MPTN\BIN\MPTSTART.CMD.
If such a file does not exist, create one and add the line CALL=C:\OS2\CMD.EXE /Q /C C:\tcpip\bin\tcp-start.cmd >NUL:
(or MPTSTART.CMD, respectively) to your CONFIG.SYS.
Using Warp 4 or later you can also activate the interface more conveniently by opening the TCP/IP Configuration (LAN) object, selecting the notebook page Network, selecting loopback interface for configuration and ticking the configuration option Activate interface. The entry field IP Address must contain the 127.0.0.1 address.
ping localhost
If all is correct, the values for "time" should be 0 seconds each. Terminate the program after some time by pressing <CTRL-C>. A packet loss of 0% should be displayed.
Now XFree86/OS2 has to be adapted for your hardware, i.e. the video adapter, the monitor and the keyboard. For this the horizontal sync rates and vertical refresh rates of your monitor and data about your keyboard (number of keys, country version) are required. If your monitor supports DDC, as will be most probably the case with modern monitors, XFree86/OS2 will be able to detect its capabilities automatically. Otherwise you will need to get the values from your monitor's manual.
Configuration can be done in a number of different ways. In the following the most convenient is described.
xfree86 -configure
The screen will go black, some text will scroll by and then the desktop should reappear after a short time. If it does not do so, press <CTRL-ALT-BACKSPACE> to kill the X server. If that still does not work, you will have to reboot the machine by pressing <CTRL-ALT-DELETE> and ask for help.
(II) MGA(0): VESA BIOS detected
(II) MGA(0): VESA VBE Version 3.0
(II) MGA(0): VESA VBE Total Mem: 16384 kB
(II) MGA(0): VESA VBE OEM: Matrox Graphics Inc.
(II) MGA(0): VESA VBE OEM Software Rev: 2.1
(II) MGA(0): VESA VBE OEM Vendor: Matrox
(II) MGA(0): VESA VBE OEM Product: Matrox G400
(II) MGA(0): VESA VBE OEM Product Rev: 00
If your monitor supports DDC, you should also see something like the following:
(II) Loading sub module "ddc"
(II) LoadModule: "ddc"
(II) Loading j:/XFree86/lib/modules/libddc.a
(II) Module ddc: vendor="The XFree86 Project - XFree86/OS2"
compiled for 4.3.0, module version = 1.0.0
ABI class: XFree86 Video Driver, version 0.6
(II) MGA(0): VESA VBE DDC supported
(II) MGA(0): VESA VBE DDC Level 2
(II) MGA(0): VESA VBE DDC transfer in appr. 1 sec.
(II) MGA(0): VESA VBE DDC read successfully
If DDC is not reported to be supported, you will need to provide the information about your monitor's capabilities yourself (get them from your monitor's manual).
Last, you should see a message that a new configuration file called XF86Config.new has been written to your HOME directory.
Now we need to use XFree86's new configuration program. It offers both a GUI and a plain menu-driven textmode interface, each of which have their advantages. While the GUI provides more options and flexibility, the textmode version has less "distractions" and does not require the X server to be running. Note however, that the textmode version requires the ncurses library to be installed correctly. So if you aren't sure that the X server has detected your hardware correctly, you may want to use the textmode version and continue with chapter 6.2.
In the following, the behaviour of GUI elements is different from standard OS/2. To invoke any pop-up menus and select items from them or menu bars, you need to click and hold the mouse button!
startx
The screen should go black with some text displayed for a short time. Then the system should switch to graphics mode and you should see a black "X" cursor on a grey pattern background. Some seconds later, you should notice some hard disk activity and two windows should appear, one with a command line prompt on the top left and a clock on the top right.
WARNING: If this does not happen and you see a distorted display or your monitor starts making strange noises, press <CTRL-ALT-BACKSPACE> to kill the X server immediately! Otherwise your hardware may get damaged.
Note: Depending on the detected hardware's capabilities, the X server might start at an enormously high, interlaced resolution. While this is not good for your eyes, it shouldn't pose any problems for your hardware.
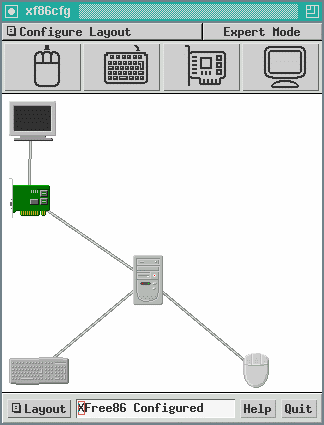
xf86cfg
Then the outline of the configuration programs window will be displayed for you to determine where to display the full window. Place it anywhere you can view the complete content. The command line window will display a large number of messages about modules being loaded. Unless the program crashes completely, it is safe to ignore any error messages about not loadable modules.
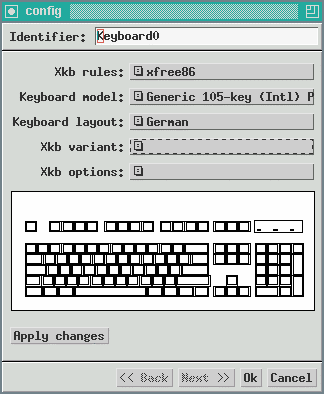
WARNING: Wrong values can result in damaging your
monitor! If you are in doubt about your monitor's capabilities, it is safer to select
lower rates.
CAUTION: When specifying decimal values, always use
a dot as separator, no comma!
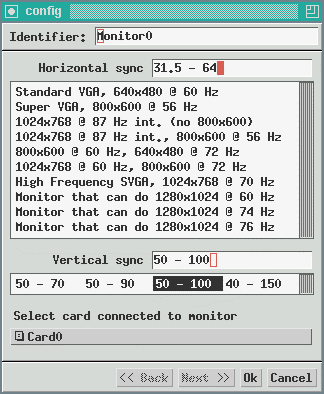
Example: An old SONY Multiscan 15sf is not capable of DDC and has a horizontal refresh rate range of 31.5 - 64 kHz. The list entry Monitor that can do 1280x1024 @ 60Hz equals a range of 31.5 - 64.3 kHz. Being the cautious type we don't select that entry, but define my our range by entering the according values in the entry field. The SONY's range for vertical refresh rates is 50 - 100 Hz, so it's safe to select the 50 - 100 item.
Confirm the changes and leave the dialog by pressing OK.
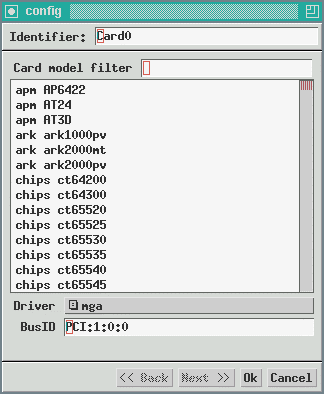
Example: For a Matrox G400 Double Head with 16 MB of video RAM, scroll down to and select mga mgag400. The rest should be detected automatically on startup.
Depending on the video chip in your hardware, the XFree86 drivers often offer
a number of special options to enable or configure support for advanced features.
Normally, you don't need to change any of these options.
To set these options, right-click on the video adapter symbol and select options.
A dialog will show up which allows you to select from the options which are available
for the current driver. For details about the available options, see the HTML files
in Y:\XFree86\lib\X11\doc\html. These files follow the <driver_name>.4.html
naming scheme.
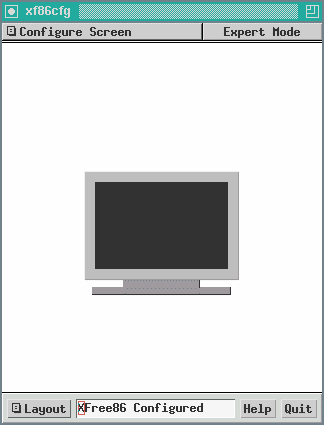
Right-click on the monitor symbol and select configure. The default color depth of 8 bit resembles 256 colors, which is too few for most of today's applications. Choose 16 bit for 65536 colors or 24 bit for 16.7 million colors. If required, you can still start the X server at a different color depth via a command line option later. The left pane below shows the scrollable list of available resolutions, while the right pane shows the selected ones. With the arrow buttons in the middle you can add resolutions to or remove resolutions from the right and move them up or down in the right list.
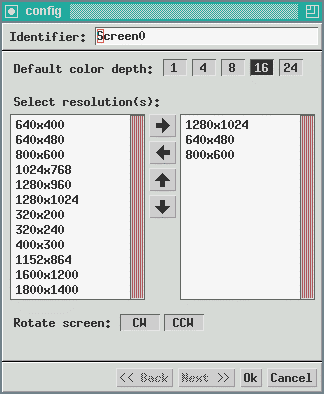
The list of resolutions on the right defines the resolutions which the X server will be able to use at a given color depth. The topmost resolution will be the default resolution which the X server uses upon startup. If later while running XFree86/OS2 you should feel the need to use another of the other resolutions in the list, e.g. to play a game which requires a resolution of 640x480, or to work with some graphical application which consumes a lot of screen real estate, press the key combination <CTRL-ALT-+> or <CTRL-ALT--> (+/- from the numeric key block only) to cycle through the list of defined resolutions.
CAUTION: Note that xf86cfg creates the necessary entries in XF86Config for the default color depth only! If you start the X server at another color depth, don't be surprised, if it used another resolution. To workaround this problem, make a color depth which you want to setup resolutions for the default, setup the resolutions, and close the dialog by pressing Ok. Then re-open the dialog and repeat the same for the next color depth. When you have configured all color depths, open the dialog a last time, mark the default color depth, and close the dialog again by pressing Ok.
Example: For a 19" monitor a good choice would be to use 1280x1024 as default resolution (at the top of the right list). If you like to play a game now and then and the game is not able to use more than 640x480 pixels, add 640x480. Then you can switch to 640x480 by pressing <CTRL-ALT-+> whilst running at 1280x1024.
Confirm the changes and leave the dialog by pressing OK.
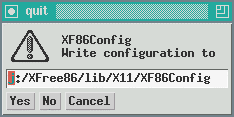
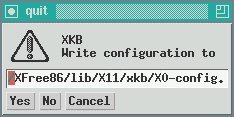
If you press Yes, another confirmation for the keyboard settings file with the same choices will appear. Press OK to save settings and quit the program.
exit
Finally, quit the window manager session (and thereby XFree86/OS2) by right-clicking on the desktop background and selecting Exit.
Please continue with chapter 7.
While the textmode interfaces offers graphical menus, it does not support the mouse. Navigation is done with the arrow keys, checkboxes are selected by pressing the space bar, and control elements which have the focus (colored blue) are activated by pressing <ENTER>.
xf86cfg -textmode
You will see a lot of messages regarding the loading of modules scroll by. Unless any severe error occurs, you should see the following welcome message:

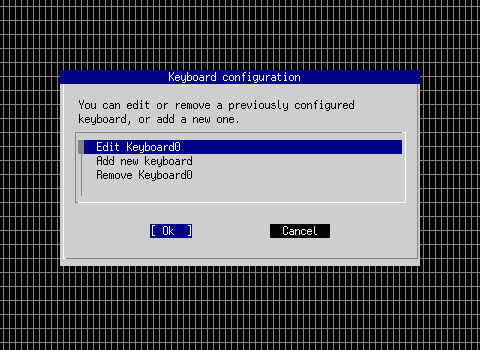
Select Edit Keyboard0 and press <ENTER> to edit the keyboard definition. The Keyboard model dialog lets you select your type of keyboard. Note that the list of available models is very long. Scroll with the up and down arrow keys to see which menu item suits your keyboard best.
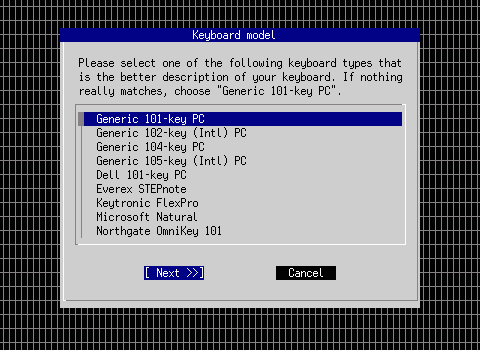
Most people who own a modern standard keyboard with Windows keys will want to select one of the Generic 104-key PC or Generic 105-key (Intl) PC models. Select your preferred item and press <ENTER>.
Then select your language-specific layout from the Keyboard layout list. Note that this only specifies the keyboard's layout, not any internationalisation support.
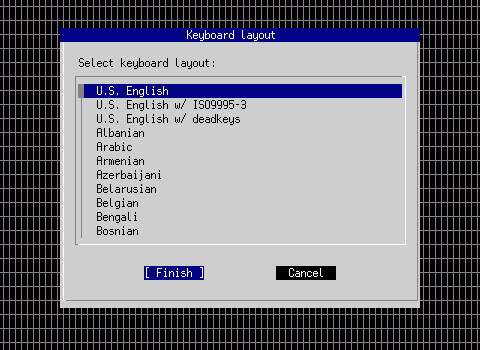
Confirm your selection and finish keyboard configuration by pressing <ENTER>.
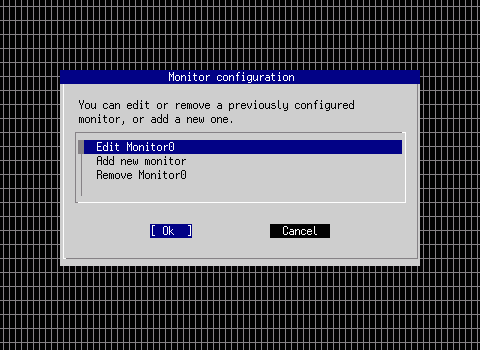
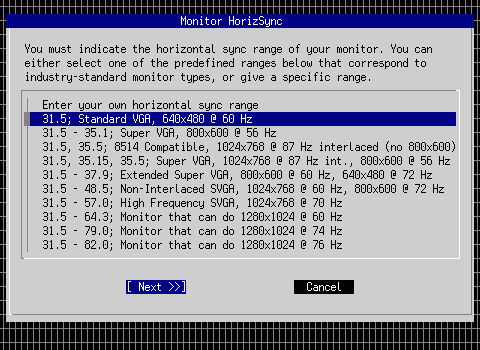
To configure your monitor, select Edit Monitor0 and press <ENTER>. This brings up the Monitor HorizSync dialog, where you need to specify the range of horizontal sync rates which your monitor is capable of. You can do this by either selecting one of the predefined values (the values of the beginning of each line specify the rate, rates, or range of rates), or by selecting Enter your own horizontal sync range to manually specify the range.
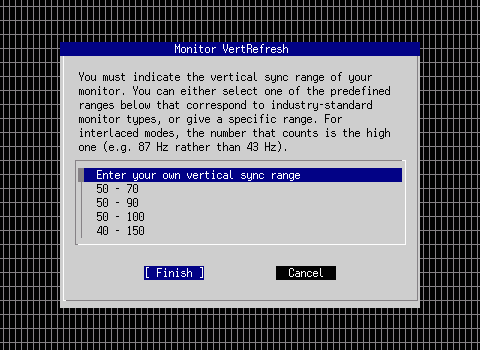
Next we need to specify the vertical refresh rates in the Monitor VertRefresh dialog. You can do this by either selecting one of the predefined ranges, or by selecting Enter your own vertical sync range to manually specify the range.
WARNING: In both cases, wrong values can result
in damaging your monitor! If you are in doubt about your monitor's capabilities,
it is safer to select lower rates.
CAUTION: When specifying decimal values, always use
a dot for separation, no comma!
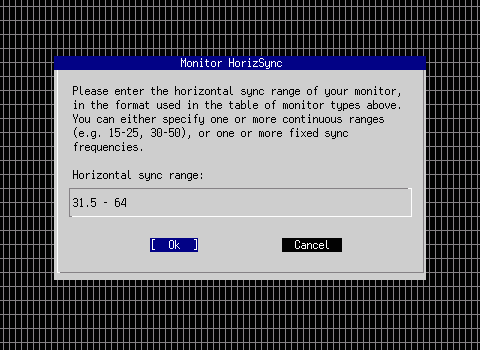
Example: An old SONY Multiscan 15sf is not capable of DDC and has a horizontal refresh rate range of 31.5 - 64 kHz. The list entry Monitor that can do 1280x1024 @ 60Hz equals a range of 31.5 - 64.3 kHz. Being the cautious type we don't select that entry, but define our own range by selecting Enter your own horizontal sync range and entering the according values in the entry field and pressing <ENTER>:
The SONY's range for vertical refresh rates is 50 - 100 Hz, so it's safe to select the 50 - 100 item and finish with <ENTER>.
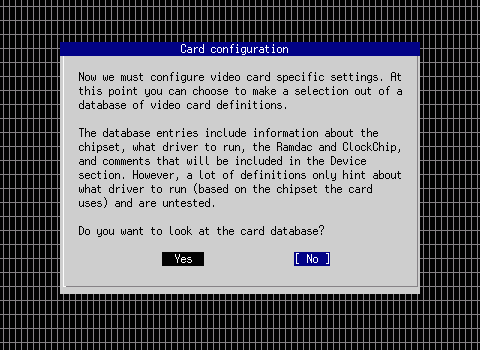
The database of video card definitions provides a convenient way to choose the appropriate drivers. So unless you have some very new or exotic stuff, select Yes with the arrow keys and press <ENTER>.
The Card database dialog presents you with a large scrollable list of video chip sets. Note that chip IDs are listed only, not the vendor name. Looking for Matrox won't work, for instance, but mga does. You can also jump to the first chip name that begins with a certain character by pressing the according key.
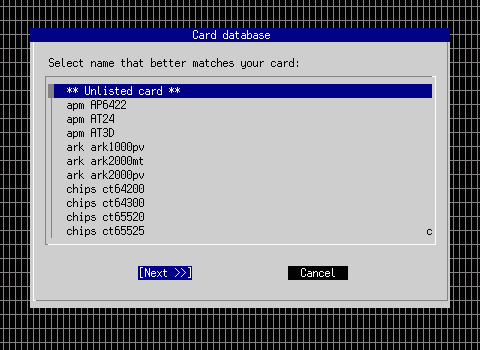
Example: For a Matrox G400 Double Head with 16 MB of video RAM, scroll down to and select mga mgag400. The rest should be detected automatically on startup.
When you select a card, the dialog will automatically select a suitable driver in the following Card driver dialog:
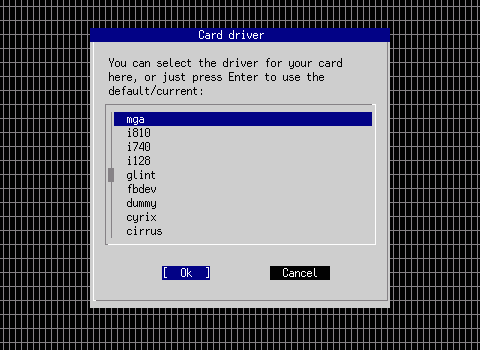
If you think that xf86cfg did not select the correct driver, you can still change it by selecting from the scrollable list. The vga driver should always work, but it is very slow and only works at a resolution of 320x200.
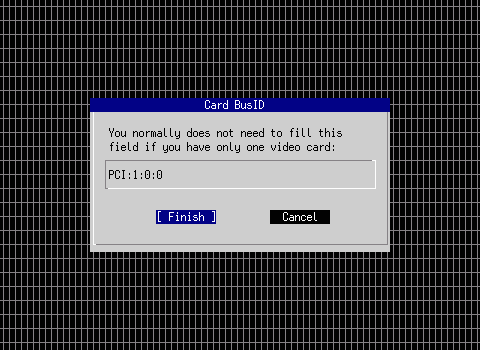
Finally, you need to specify the card bus ID. Do not change this field unless you have more than one video card and simply finish by pressing <ENTER>.
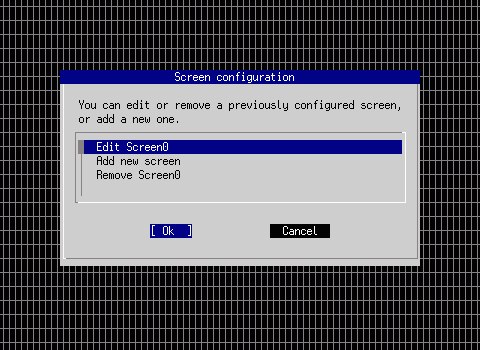
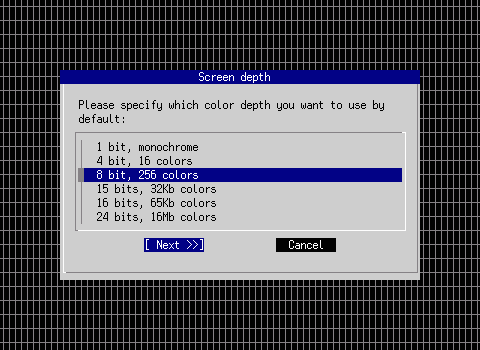
Select Edit Screen0 and press <ENTER> to bring up the Screen depth dialog. There you can specify which color depth you want XFree86/OS2 to use by default. The default color depth of 8 bits resembles 256 colors, which is too few for most of today's applications. Choose 16 bits for 65536 colors or 24 bits for 16.7 million colors. If required, you can still start the X server at a different color depth via a command line option later.
The list of resolutions in the Screen modes dialog defines the resolutions which the X server will be able to use at a given color depth. Select all resolutions you want to use by highlighting them and pressing the space bar. The highest selected resolution will be the default resolution which the X server uses upon startup. If later while running XFree86/OS2 you should feel the need to use another of the other resolutions in the list, e.g. to play a game which requires a resolution of 640x480, or to work with some graphical application which consumes a lot of screen real estate, press the key combination <CTRL-ALT-+> or <CTRL-ALT--> (+/- from the numeric key block only) to cycle through the list of defined resolutions. Finish your selection by pressing <ENTER>.
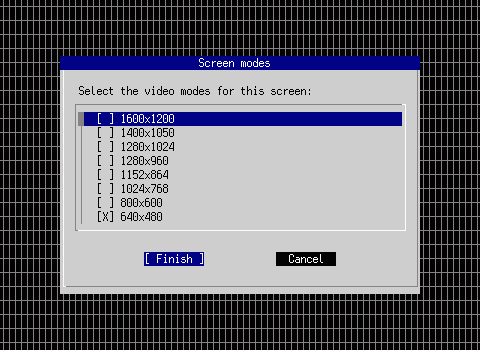
CAUTION: Note that xf86cfg creates the necessary entries in XF86Config for the default color depth only! If you start the X server at another color depth, don't be surprised, if it used another resolution. To workaround this problem, make a color depth which you want to setup resolutions for the default, setup the resolutions, and finish. Then re-open the dialog and repeat the same for the next color depth. When you have configured all color depths, open the dialog a last time, mark the default color depth, and finish setup again.
Example: For a 19" monitor a good choice would be to use 1280x1024 as default resolution. If you like to play a game now and then and the game is not able to use more than 640x480 pixels, add 640x480. Then you can switch to 640x480 by pressing <CTRL-ALT-+> whilst running at 1280x1024.
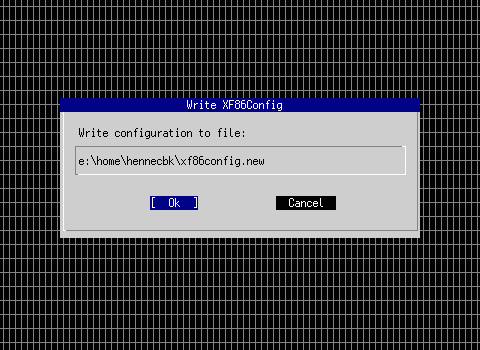
If everything is OK, select OK to save the main configuration file XF86Config. Otherwise select Cancel to return to the main menu.
Now you can start XFree86/OS2 from a command line via: startx
If you prefer another color depth than the default, enter the following for e.g.
16 bit: startx -- -depth 16
It is recommended to create a program object for XFree86/OS2 on your desktop.
Enter the following for Path and filename: Y:\XFree86\bin\startx.cmd
And for Parameters: -- -depth <color_depth> 2>Y:\xerror.log
with <color depth> being the bit value for the preferred color depth. The parameter 2>Y:\xerror.log redirects the error output of the X server to the file Y:\xerror.log, so you can get some hints on problems, just in case.
By default XFree86/OS2 uses twm as Window Manager. Since especially twm offers only very basic features, you'll probably soon consider using another Window Manager. To activate your new alternative, copy the file XINITRC.CMD which normally resides in Y:\XFree86\lib\X11\xinit to your HOME directory, open it in an editor and replace the line 'twm' by 'your_window_manager_executable', e.g. 'enlightenment'. The single quotes are not optional! XFree86/OS2 will find the changed file upon startup and use it instead of the original one in Y:\XFree86\lib\X11\xinit.
Parts of this text have been taken from the README.OS2 file contained in the XFree86/OS2 3.3.x distribution, © Holger Veit.
References:
XFree86/OS2 4.3.0 |
[Feature Index]
editor@os2voice.org
[Previous Page] [Newsletter Index] [Next Page]
VOICE Home Page: http://www.os2voice.org